


“Facebook: The Lowdown on Advertising, and What We’ve Found Works Really Well” plus 1 more | |
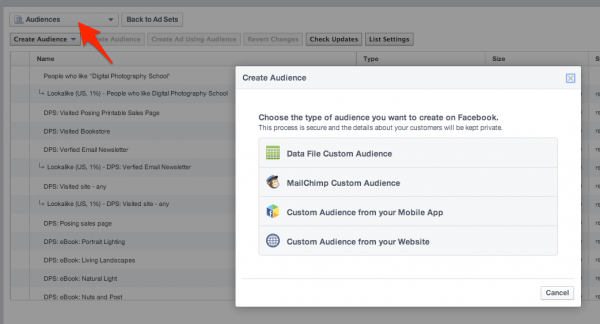
| Facebook: The Lowdown on Advertising, and What We’ve Found Works Really Well Posted: 07 Aug 2014 09:33 AM PDT Often when I float the idea of advertising amongst my blogging colleagues (including Darren) I get looks of skepticism, dismissal, and that blank empty stare of disinterest. You might have that look on your face already. In some ways I can understand that sentiment. As bloggers, for more than a decade we have leveraged our content as the main drawcard for attracting visitors to our blog through free means such as organic search (SEO), social media, and incoming links and referrals. I say free a little loosely here, as yes you’re not paying money directly out of your pocket for these activities, but the time you spend on managing social and search for example stops you from doing other things. Things like crafting better content, creating a product, talking with an advertiser, etc, so it does come at some cost. That said, this approach is a bloggers true competitive advantage, and we essentially earn money by selling ads or access to our audience to those who can’t figure out their own content strategy — we certainly don’t buy them! Right? Well today I’m hoping to challenge that today. You’ll never ever hear from me that advertising is a replacement for your content. Your content is the pillar and driving force behind everything you do. But what makes a blog truly valuable is the audience and community you build around it. This community is what and who you create your products and services for, it’s what appeals so much to advertisers. Advertising when done right is a way to help you expand the community you have today. To accelerate your growth. To find new readers in different markets and to sell more of your stuff. Advertising has been around for a lot longer than blogging. And there’s a good reason for that — when done right, it works. There are so many options when it comes to advertising your blog. You can spend (and burn) tens of thousands of dollars very quickly if you are not careful. Unless you’re in the top 5% of bloggers already, it’s just too risky to put that sort of coin on the table. That doesn’t exclude you from advertising altogether though, as there are platforms that enable you to take very small steps and grow. You can spend as little as $5 to see some value. You can then step that up to $6 when the return on investment is there and you are ready. You’re in total control and can extend you investment and your reach at your own pace. Google Adwords and Twitter are good options for this, but the one that excites me the most at the moment is a platform you’re probably already using for ‘free’ right now, and that’s Facebook. We’ve been using Facebook advertising for around 18 months on Digital Photography School. It started fairly haphazardly, and I felt we were more donating money to Facebook’s shareholders than delivering any real value. It was when I decided to spend the time to really understand how Facebook advertising is actually done did the penny drop and our Facebook advertising strategy was transformed. I’m hoping by sharing what we’ve learned it makes life easier for you so you’ll have the confidence you need to run successful Facebook ads yourself. How we approach advertising on FaceBook for dPSNow I don’t consider myself a Facebook marketing expert, and I know I have a lot to learn. I often say to Darren that I could spend an entire year tweaking and adjusting our ads and still not be done. But as I like to play with new toys, I wasn’t going to let it get the better of me, and thus our story begins … PrepareYou’re about to spend some of your own money on advertising, even if it’s a small amount. Unless you’re cashed up, careful preparation is important to make every dollar count. When we starting looking ad advertising options, we broke down our own preparation into three groups: learn, plan, and get your house in order. LearnDarren and I were the first to admit to each other that Facebook advertising was a mystery to us both, but in the same breath we both knew it was an opportunity we were missing. We could either just accept that as fact or take the time to learn what it was all about. Darren had been following Jon Loomer for a while and shared with me some links. I subsequently absorbed a lot of extra content from Jon and was lucky enough to interview him in a Problogger Community Webinar recently. My second port of call was with a person I’d know for some time, Jen Sheahan. I met her first during my time at SitePoint but she’s since gone on to create a Facebook advertising company of her own. With pretty big-name clients, she sure knows what she’s talking about. Both Jen and Jon shared similar insight to me about how to approach my campaigns which I’ll cover more later, but one thing they both said to me clearly was to spend the time getting to know the power editor, as that’s where the gold lives. Since then the general Facebook ads manager has got a lot better, but I still tend to spend most of my time managing our campaigns in the power editor. Some notes about the Power Editor:Before we continue on into some real examples, there are some concepts around the power editor that I need you need to understand (or my examples won’t make any sense at all). They are: Custom Audiences: These are collections / groups of people that you define inside the power editor. They can be saved as groups of Facebook target segments, e.g. people in the USA, female, with a house value above $500,000 who are not a fan of yours (and about a million other variations). They can also be groups that you upload yourself such as your email subscriber list, or customer list. Facebook will match the email address you provide with a Facebook user and contain them all in a group. Or it could be a user who visits your blog, or even a specific page in your blog.
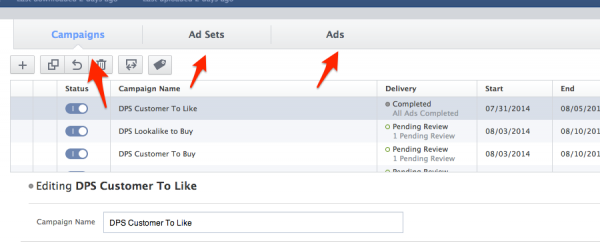
Campaigns: Campaigns are the starting point of your advertisement. Not only do they given them a name, they also contain your objectives eg Like, click, sale. Ad Sets: These are the second level of your advertisements and contain all the money information. How much you want to spend (per day or single amount) and when you want to start and finish your ad. Ads: Ads is the ‘thing’ that facebook users will see. They hold the creative, and the targeting information, and how you will pay for the ads. eg. Cost per click, cost per 1,000 impressions. These ads can be both side column ads and in newsfeed ads.
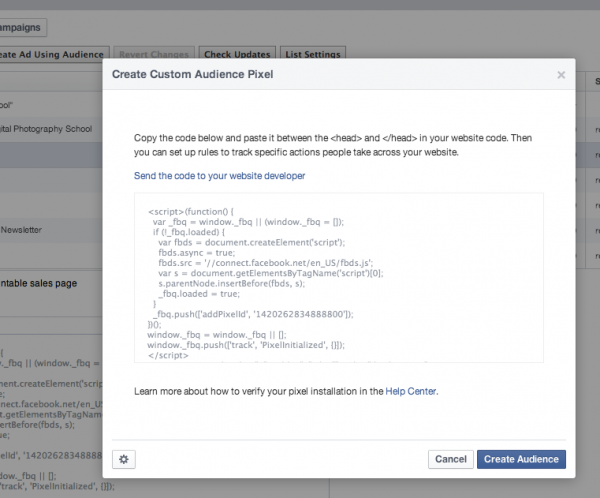
Custom Audience Pixel: This is a little snippet of code you put on your site to start creating custom audiences on Facebook to people who visit. When someone visits a page you send a little message to Facebook saying add this user to a customer audience under the settings you define. You can for example create a custom audience of all visitors to your blog (that are also on facebook) or all visitors to a specific or collection of pages. Or a combination of all. You can also specify how long to keep that visitor in your list (up to 180 days). If that’s confusing, don’t stress, I’m going to share what we use as a case study for you to start with.
Conversion Pixel: This is a little bit of code that tells Facebook that a visitor has successfully completed the action you wanted. It might be to buy something, or it might be to sign up to a newsletter. You put this code on the ‘success’ page in your checkout / sign up process. For example the landing page someone sees after clicking the verification link in your email confirmation.
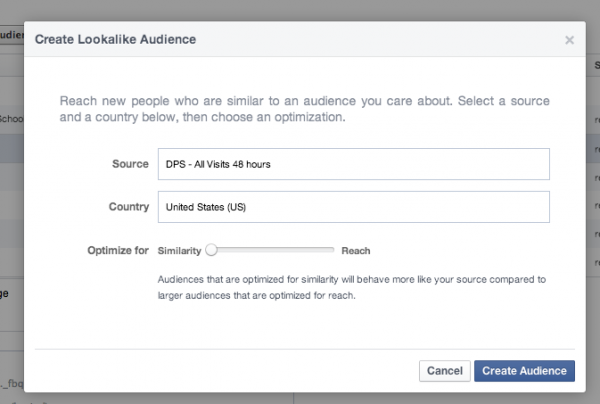
Lookalike Audiences: This is an audience that Facebook creates for you based off an existing custom audience. So for example if I’ve created a newsletter subscriber custom audience, Facebook can create for you a audience that is similar to that group. I can specificy how accurtate I want to that be. The less accruate the bigger the target group will be.
Okay so that’s the power editor. We can move on now. PlanYou hopefully have an idea of the different types of ways you can target users and you have an idea of what you want them to do. It’s time to start planning all the different types of campaigns you are going to run. Think along the lines of:
With dPS we are currently running 9 main campaigns:
Some other types of campaigns we have run
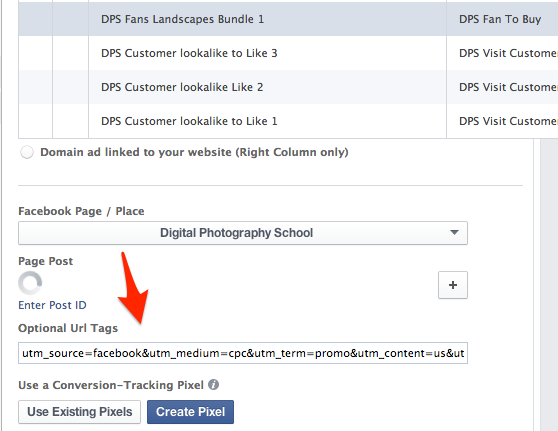
Setting budgetsWhen we set budgets we tend to first run a set figure, so $10,$20,$50 after that we review and decide if we’ll run it ongoing. Only three of our 9 campaigns are set to ongoing at this stage. I also like to set budgets before I’m in the power editor as I like to see the total spend. $5 doesn’t seem like a lot when you are looking at the one campaign, but 5 X 100 campaigns you want to see up can add up pretty quickly. Get your house in orderOnce you have a plan for the types of campaigns you want to run initially it’s time to get everything set up. Get your advertising account set upYou’ll of course need some way for Facebook to take your money so you’ll need to set up an ads account. Chances are if you’ve used the ‘donate to Facebook’, sorry, ‘boost post’ button in the past, you’ve already done this. As you create more ads over time, Facebook will allow you to spend more but you still remain in control. Get your tracking in placeIf you want to use custom audiences that include visitors from your site you’ll need to set up the tracking pixel. This was actually a little harder for me that I expected so I decided to commission a plugin to make that easier for wordpress users to install the Facebook tracking pixel. Best of all it’s free and you can download it here. Watch the video for details on how to use it. Get your segments and custom audiences readyOnce you have your tracking pixel set up, you can start creating custom audiences. With dPS we have a lot. Audiences for all visits to the site across different time delays. Separate audiences for visits to our sale pages the list goes on. Initially keep things simple and create audiences for the campaigns you planned above. Then let your imagination run wild. Your custom audiences should include any lists you can upload as well such as your newsletter and customer list. Once you’ve set up your audience it’s time to setup your lookalike audiences. When creating a lookalike audience you’ll be able to select your custom audience to base it off. You would finally then create general target segments that you might use to target specific interests and types of Facebook users. Remebering that this type of segment is the one I’ve struggled most with trying to deliver value for spend. If you’ve made this work I’d love to hear more. We now have to people to advertise to. The final preparation step is to… Get your Facebook page in good standingNow I’m kinda lucky here as I have a pretty savvy guy named Darren ensuring that the Digital Photography School Facebook page was in good standing. Great engagement, good visuals, and a constant stream of new content makes anything I wanted to do with advertising so much easier. Not everyone has that luxury, so you’ll need to make sure your organic activity and the setup of your Facebook page is in tip-top shape. CreateOkay so we’re staring to round the final turn here and we’re close to setting live your first ads. Everything is set up, we have our audiences, we have our campaign plan, now it’s time to put them all into the the power editor… Creating your first campaignYou start by giving it a name, then picking your objective and setting any custom fields you might need (dependant on the objective). You should already have most of that that in your planning. Once you have set up your campaign you then create an ad set that you link to a campaign, give that a name then set your start / finish times and your budget. Setting up the adsI’m sure by now you feel like you’ve come a long way, and you have. Now it’s ad setup time. You’ll need to enter: Creative: There’s a whole different post on what creative to use on your ads and everyone has an opinion. But regardless of what others experience, experimentation is the key to finding what works for you. Copy: There will be areas to enter limited text. Titles descriptions and buttons to your add. Again, just like copy, testing and practice makes perfect. Placements: You’ll have to decide if you want the ads to show in the sidebar, the newsfeed, and on mobile. For a while I focused mainly on the newsfeed and mobile, but my recent webinar with Jon questioned the legitimacy of that, so I’m currently testing all options Targeting: This is where you tell Facebook who to show the ad to. You’ve set up your target audiences already, so you don’t need to worry about all the profile stuff. Simply add your audience at the top, exclude any audiences you don’t want see the ads (and the same for fans at the bottom), and you’re good. Charging model: The final step with your ad is to select CPC (cost per click) and big on that or CMP (cost per thousand impressions). I tend to stick with optimized CPM, but only because that’s what I was advised to, I do want to play around with that a little more. You can run multiple ads under the one ad set, and I do that I a lot. But what I also find is that Facebook tends to decide which ad they are going to run out of the group very quickly. I think too quickly and that will result in one add showing 99.9% of the time and the rest only 0.01%. Not sure why that’s the case and the only way around that is to create multiple ad sets with single ads. If your ad is about a click, think about your landing pagesYou’re getting a very targeted click from Facebook when someone follow your link to your page. Spend time getting that landing page right for the user. We don’t send people directly to our sales pages for ‘buy’ related campaigns. We send them to a page we set up just for Facebook traffic. You can see an example of a current bundle we’re running right now. Note about the conversion pixel: If you campaign success is conversions, Facebook will give you a tracking pixel for the campaign. As I mentioned earlier this needs to be put in your ‘success’ page for the action to be sent back to Facebook. The good news is that the Facebook plugin for wordpress you might have used for the tracking pixel also allows you to put the success pixel on any page or post of your blog. This will work only if your success page is on your own site. For example we currently use e-junkie on dPS and we can’t edit the ‘success’ page so we can’t track sales in this way. We do however track success through analytics using the optional URL tags field in our ad setup. By entering: utm_source=facebook&utm_medium=cpc&utm_term=promo&utm_content=us&utm_campaign=landscapebundle It will attach campaign data (you’ll need to change landscape bundle to something else) to any sale Google Analytics records in it’s commerce area and thus we can report on a campaign level how many sales and how much revenue we make.
We’re now all set up and ready to set our ads live. If your using the power editor you need to upload your changes (top of your screen). Once you do that you’ll send all the campaign data to Facebook. Facebook will review your ad and approve. I think there are two stages to this as I’ve had a few ads unapproved after being approved. Which is kinda weird. Review your resultsIf you’ve set your campaigns to start straight away, you’ll actually start to see results pretty fast. You’ll want to leap to conclusions pretty quickly, but my suggestion is wait a least 24 to 48 hours for a more detailed story to be told. When you have a little more insight, that’s when you can take some action. Reports are found in your ad manager where you’ll see what you’ve spent, your reach and depending on your campaign type, likes, clicks, reach clicks or conversions.
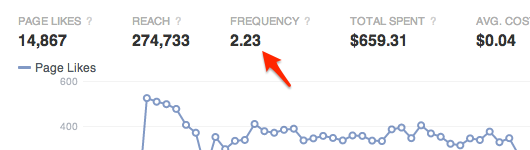
You’ll be able to compare all your campaigns side by side to pause poor performances, increase budgets on your strong performers, edit ad creative and copy, change landing pages. These real time changes help you improve the performance of your current campaigns, but also inform you about the next campaigns you might want to run. Darren and I will talk through campaign performance as often as we can. Trying to understand what’s working, making decisions on what to continue with and stop, and brainstorming on new ideas. Our results:From a ‘boost post’ perspective: The only real value we’ve seen from a boost post perspective is when we boosted a product promotion update. We had a result that was nearly a 500% return on investment in first purchase which is a phenomenal result in any anyone’s advertising book. Boosting content posts to help build a viral effect just hasn’t worked for us the handful of times we’ve attempted it. But we’re not done yet! From a ‘like standpoint’: We’ve seen costs per likes range from 1 cent to over $1 (we stopped that one pretty quickly). On average it’s around the 7 cent mark. The impact of this is hard to gauge as the reach and traffic we get has just as much to do with the content and timing of the post as it does the volume of likes we have. So it’s difficult to know 100%. What we also notice is that when we are advertising for likes, our organic likes seem to jump as well. So in real terms that 7 cent per like might be a little understated. From a sales standpoint: I haven’t actually run a campaign on Facebook targeting sales that hasn’t been profitable. The returns have been from $5 in sales for every $1 we spent to $1.20 in sales for every $1 we spent. We haven’t spend piles of money on the ads just yet but it’s very promising. I suspect that the more we spend the less return on investment we get, as we have to chase a wider audience but time will tell. ExpandOnce you’ve done the hard work to set everything up and your first couple of campaigns behind you, I’m sure your mind will be buzzing with ideas. Just like we were. Our approach as we look to expand our Facebook activity to fall into these principles. Test and add budget to what’s workingDarren and I am both open to testing things in moderation. We’ll use small budgets on ideas and then add once we’re convinced it will work. We’ll keep doing that with who we target and what we ask of them. Look for new segments and narrow the ones we have We’ll continue to both expand into new segments, as well as be smarter in the ones we have. For example knowing what type of post you visited on dPS could inform me what type of advertisement image you’ll be receptive to, or what sort of product you might like. Be careful on how many times you show your add We’re also very cautious not to over-advertise to our audience. Facebook will continue to show your ads to people as long as you’re prepared to keep paying. There’s a figure in your campaign reporting you need to be looking at – ‘frequency’. That tells you the number of times an ad was shown to a user. We want to keep that to no more than five in a campaign.
You don’t have to advertise all the time We also want to ensure we pause our ads from time to time. This not only give us a little break, we’ve found that short bursts net a better result than one steady steam of ads. So that’s how we approach advertising on Facebook with dPS.We feel we’re just getting started with our story here and I’m sure there will be much more to share over time. I’m sure there are a stack of personal experiences that others have had, I’d love hear. I’m learning something new every day too! With advertising – before you give me that blank stare again, just remember, as a blogger growing your audience is important. It’s a big part of the value your blog holds. Advertising is a great way to support and help accelerate that. There’s a reason business and people pay to reach your audience. Shayne Tilley is the marketing guy for ProBlogger.net and Digital Photography School. The author of the PB Guide to Online Marketing and a long time contributor to the blog. When he's not thinking of new and interesting ways to grow the ProBlogger sites, he's either bashing up developers or hanging out with the swiftly.com team. Originally at: Blog Tips at ProBlogger |
| Theme Week: Tips and Tricks to Nail Facebook Advertising, a Webinar with Jon Loomer Posted: 06 Aug 2014 09:53 AM PDT
Jon Loomer, the King of advanced Facebook marketing, recently stopped by ProBlogger.com to share his insight and specialist tips on all things Facebook advertising. Not just for business with big budgets, targeted Facebook ads and a little forethought can be useful for any kind of blogger wanting to reach out to readers. The full webinar is available for ProBlogger.com members (you can sign up here). So what are the benefits of Facebook advertising for bloggers?Jon says it’s really for anyone looking to drive traffic to a website. When you build an audience on Facebook, you’re sharing that website with people who have shown an interest in wanting to read it. As a bonus, many people who pay for advertising on Facebook also report an increase in organic reach. Why should you pay for advertising when you can use Facebook for free?
Boost Post versus Power Editor – Is one really more useful than the other?
What about more sophisticated campaigns?Website custom audiences are Jon’s favourite feature – it's not just a matter of targeting anyone who visits your website, but also narrowing it down to specific pages they’ve seen, or articles they’ve read on your site. So how does Facebook know what your readers are looking at? Facebook provides conversion pixels, which uses cookie information from your blog. When they return to Facebook after your site, they will then see a targeted ad. Only one code is needed, but you can create many different rules that depend on visitor information. Even better, when you promote your new blog post, you can tell Facebook to exclude the readers who have already read it – effectively saving you money. To take advantage of this, create a Website Custom Audience for every sales line you have, every landing page, every success page, every important blog post. Think about the categories of content you have that would appeal to different people, and tailor your ads to suit. What makes a good ad?
What else is on the webinar?
Tune in tomorrow for our marketing ninja Shayne Tilley, who will take you through a list of Digital Photography School Facebook advertising that has seen real returns – and also the ones that didn’t do so well. Have you tried Facebook marketing? Has it been useful for you?
Originally at: Blog Tips at ProBlogger |

| You are subscribed to email updates from @ProBlogger To stop receiving these emails, you may unsubscribe now. | Email delivery powered by Google |
| Google Inc., 20 West Kinzie, Chicago IL USA 60610 | |


.jpg "Free Traffic System - Increase Targeted Website Traffic with Free
Unlimited One Way Links")

0 comments:
Post a Comment